Installation instructions - heating

Assembly process

  1. assembling of base grate – iron or wooden construction
  2. installing of basics attachments pipes
  3. screw the walls panels on to the main construction
  4. connecting walls panels on conecting the main pipage
  5. clean out- run through the whole system and carrying out pressure tests for joint tightness
  6. finnishing off the bottom part of the wall
  7. patching up the whole wall with filler paste
  8. finishing the walls off by paintings

Instructions of assembly


Principles, for assembling the walls boards HEAT are the same as for plaster... board Fermacell (Fermacell  pdf súbor,  sadrovlaknite-dosky-spracovanie_08-2008)

To connect the pipes together for the walls boards is important to link up the same type of pipe, for example the pipes from company Rehau its only possible to connect with the accessories from company Rehau, for the garantee . this is valid for all the types of pipes. To make it easier, if the maker of the pipes is company Rehau, use only the accessories from Rehau, if the maker is company Wavin use just the accessories from Wavin...

We use the two main ways of assembling:

  • fitting on the grate
  • fitting by glueing the boards directly on the wall

Fitting on the grate

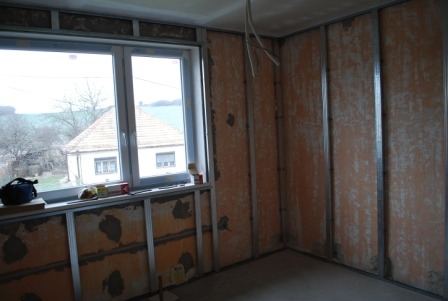
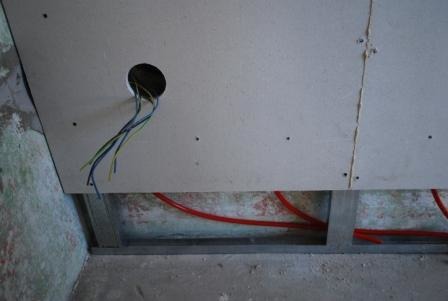
Preferable one is the steel grate. We screw on the wall C-profile, which will be screw on at vertical rovine : floor- ceiling.Batten between the steel profile would be axially 625mm, because width of the board HEAT is 625 mm.

predpripravený rošt na stenové kúrenie

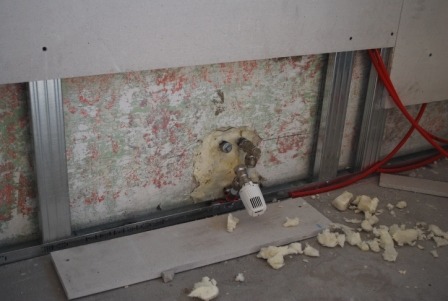
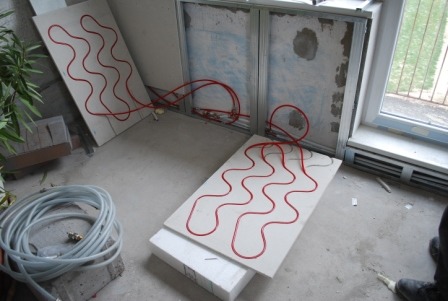
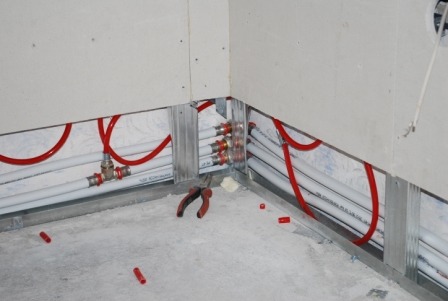
Principles: grate must be screwed on in vertical plane, so the boards which we will screw on the grate, would be also in the plane, so they are not ricochet with one another. Closely over the floor behind the grate or in the floor, - we will put valve mechanism. This system we will connect to the Tichelmana and under each panel is a apertura.

Connecting pipes are at an avarege 22mm and they have apertura at an avarege10 or 8 mm, depends on the type of the pipe, which is used in the Heat panel. At the entry of the pipe we put in the room termoregulation head, by which could be controled(alebo regulate/ the whole room, or wall.

predpripravený vývod na vodu

On a grate premakeready like this we will start to screw the boards

Principle: the first board must be put in 100% vertikal plane, as the other boards we would be attaching to the first one, and even a little error would be multiplied. We undercut the top of the board , where there are no pipes. We have to undercut the board at the top accurately, so if there would be +/- 3mm space it is possible to rub in acrylic cement.

predpripravený panel stenového kúrenia

Second options is that we undercut the panel so that the panel would be 100 mm smaller than the hight of the room on which we would screw the panels. After the battening the panel to the ceiling we will get a gap at the bottom of 100mm, which we would use for the connecting of the system and pressure control system. When we have the panel attached to the system, we put him on the steel grate, batten it to the ceiling and screw it on.

soklová montáž

After the edge of the panel is screw on, the edge which would loll against the board, we have to completely clean it of all the dust. The best is to hoover all the dust of the edge of a board and rub over with a wet cloth (this is very important, if we dont want the crack between the boards later)

On the screwed on panel with the cleaned edge we will put polyuretane glue Fermacell (jointer glue Fermacell n.of product 79023), which has a special adapting bit for better application of the glue to the egde of the board. /picture/

We clean the next board of the dust, connect it to distribution frame and push it to the board which is already screw on, and screw down the new board.

Principle: the glue between the board must be printed at the whole length of the rift to make sure that boards are equally compressed with one another.

We repeat this action to the end of covering the whole wall. U can find details of this action

How to correctly mount Fermacel boards - prefabricated walls How to correctly mount Fermacel boards - prefabricated walls

When we have done all the boards of the walls heating, then we will do a pressure test and we will force out all the air bubles by running through the pressure system. We plug in the system and check the tightness of all the connectors. When the pressure of the water in the system is not increasing and the connectors are without any indication of the water leak, we can cover up the bottom skirting with the same proceeding as the screwing and glueing of the panels.

In this way prepared wall we can clean off the glue if it came out of the rift on the joiner with the sturdi spatular.

Screws must be draw close so that they can be cement with the jointer filler paste Fermacell. In the end we cement all of the small scoring with the fine final cement Fermacell and we will regrind it all. From the wall prepared like this we just have to get rid of the dust and then we can paint it.

vyspravenie dosky

Caution: before the screwing of the board on the grate we have to cut the hole for the plug socket so that we dont damage the pipes which are in the board. It is advisable to install the wires and leave the cables for the plug sockets and other electric machinery... telephon, TV

príprava na zásuvku

Maintenance: The system is maintenance-free after the run through test and the tightness test of the jointers. It is advisable to take care of the dampness and the maximal hot watter in the system. The plaster boards like the relatively dampnes of 40% -80% at the temperature higher than 10°C. Water which heats up this system should not have the temperature higher than 50°C.

The effects: when the dampness is hight the plaster board can get damage and it can cause the total breakage. The temperature higher than 55 in the system can cause the release of crystalline water from the plaster board and the board can be destroyed.